
1. Introduction: Why B2B Installers Use Track Rails for Eyelet Curtains
Eyelet curtains—also known as grommet curtains—are traditionally designed for curtain poles. However, in commercial projects such as hotels, offices, healthcare facilities, and showrooms, track rails provide better load distribution, smoother sliding, silent operation, and higher safety compliance.
For B2B users, using a track rail for eyelet curtains offers:
- Better compliance with fire safety / commercial installation codes
- Cleaner ceiling-mounted look
- Higher load-bearing capacity for heavy blackout or acoustic fabrics
- Reduced maintenance across large-volume projects
- Compatibility with automated and motorized track systems
This guide explains how to hang eyelet curtains on a track rail professionally, with technical specifications and procurement standards required by B2B projects.
2. Understanding Eyelet Curtains & Track Rail Compatibility
2.1 What Are Eyelet Curtains?
Eyelet curtains feature metal grommets (typically 40mm–66mm inner diameter), designed to slide along poles. To adapt them to a track rail, special hanging accessories are required.
Common grommet diameters used in B2B projects:
- 40mm (standard residential)
- 50mm–58mm (hotel grade)
- 66mm (heavy drape or acoustic curtain)
2.2 Track Rail Types Compatible with Eyelet Curtains
1. Slimline Track Rail (Ceiling Mount)
- 6–8mm glider runner width
- Suitable for hotels & office partitions
- Noise rating < 35 dB
2. Heavy-Duty Curtain Track
- 12–14mm runner
- Supports heavy blackout curtains
- Recommended load: 8–12 kg/m
3. Motorized Track Rail
- Compatible with commercial automation
- Speed: 12–18 cm/s
- Requires ball-bearing or POM gliders for smooth motion
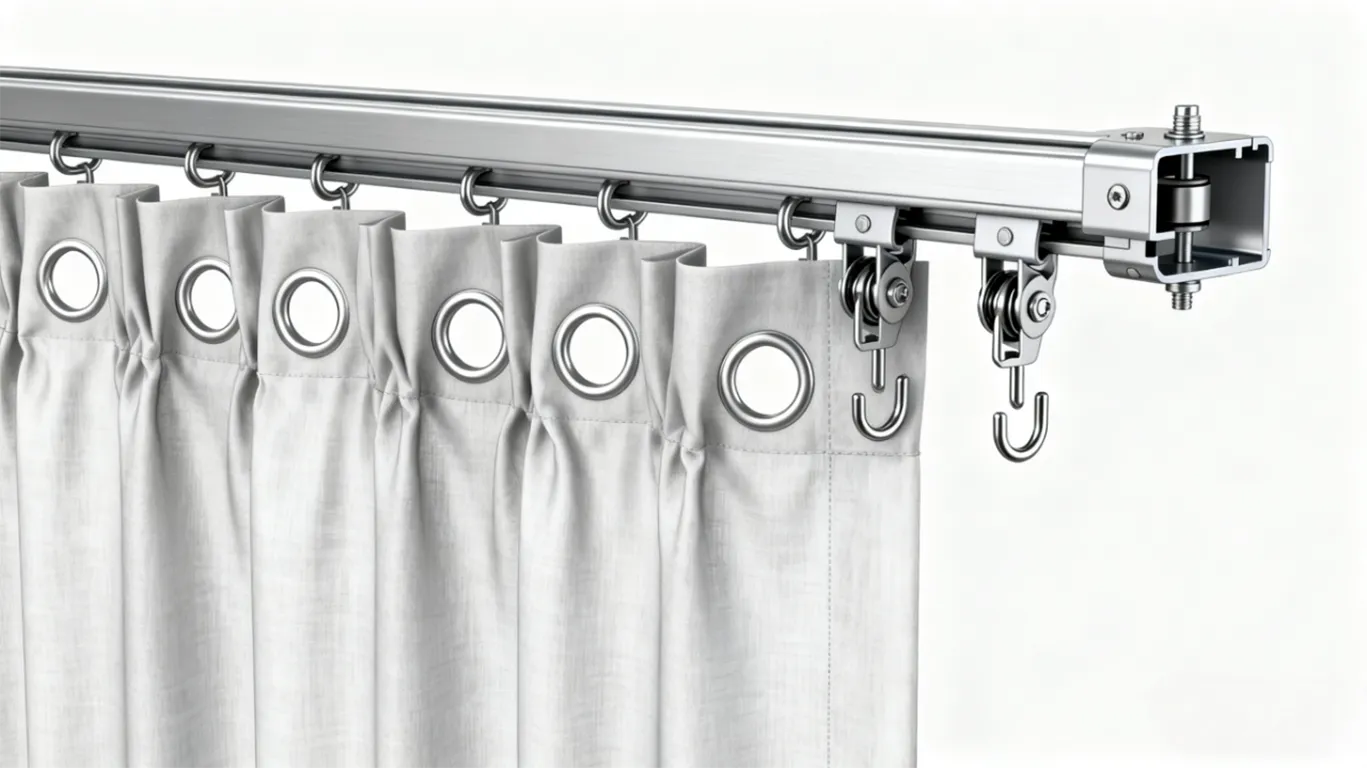
2.3 Required Accessory: Eyelet Curtain Hanging Hooks
Because eyelet curtains cannot be directly clipped to gliders, B2B installers use:
Two common solutions
- S-shaped hook (S-hook)
- Eyelet-to-track connection ring
Technical specs (recommended for commercial use):
- Material: Stainless steel 304 / Zinc alloy
- Thickness: 3.5–4mm
- Load-bearing: 8 kg per hook (minimum)
- Anti-rust coating: ≥ 48h salt spray test
B2B clients should always confirm hook spacing to match the eyelet distance on the curtain header.
3. Tools & Materials Required
Tools
- Level ruler
- Tape measure
- Electric drill
- Screwdriver / impact driver
- Ladder / scaffold for high ceilings
Materials
- Curtain track rail
- Track gliders (POM or ball-bearing)
- S-hooks / connection rings
- End caps
- Mounting brackets (wall or ceiling)
4. Step-by-Step Guide: How to Hang Eyelet Curtains on a Track Rail
Step 1: Install the Track Rail
Commercial installation standards recommend:
- Bracket spacing: 30–50 cm depending on curtain weight
- Minimum 35–40 mm screw penetration into solid structure
- Ensure perfect leveling for smooth glider movement
If installing a heavy-duty track, use reinforced brackets or double-mount support.
Step 2: Insert the Track Gliders
Insert gliders compatible with your rail type.
Recommended B2B gliders:
- POM (low-friction, high durability)
- Ball-bearing gliders for blackout curtains or acoustic drapes
Glider quantity reference:
| Curtain Type | Gliders per Meter |
|---|---|
| Sheer fabric | 10–12 |
| Dim-out fabric | 12–14 |
| Blackout/Acoustic | 14–16 |
Sufficient glider density prevents fabric sagging—critical for hotel and commercial projects.
Step 3: Attach Hooks to Eyelet Curtains
Because eyelets are usually wider than track gliders, hooks allow the curtain to “hang down” naturally.
Hook installation method:
- Insert hook through each eyelet
- Ensure the hook curvature faces inward
- Maintain even spacing according to the eyelets
Tip: For heavy curtains, choose hooks with ≥4mm thickness for stability.
Step 4: Hang the Curtains on the Track Rail
Attach each hook to the corresponding glider.
Checklist:
- Eyelet-to-glider spacing is consistent
- Curtain bottom line is even
- No twisting or crossing of hooks
- Glider tension is distributed evenly
Step 5: Perform Sliding Smoothness Test
Pull the curtain across the entire track.
If you notice resistance:
- Check for track misalignment
- Verify glider material compatibility
- Add silicone-based lubricant (avoid oil-based)
- Ensure hooks are not oversized for gliders
5. Common Issues & Troubleshooting
| Problem | Cause | Solution |
|---|---|---|
| Curtain sags | Too few gliders | Add more gliders per meter |
| Noise during sliding | Cheap nylon gliders | Use POM or ball-bearing gliders |
| Uneven curtain height | Inconsistent hook placement | Re-align hook-to-glider spacing |
| Hooks bend | Low-quality metal | Replace with ≥4mm stainless steel |
6. Specifications B2B Buyers Should Look For
- Glider material: POM or ball-bearing
- Track thickness ≥ 1.2mm (aluminum)
- Load-bearing standards: ≥ 8 kg/m
- Anti-corrosion test ≥ 48–72h salt spray
- Fire-resistant curtain header compliance (for hotels)
7. Conclusion
Hanging eyelet curtains on a track rail is a practical, durable, and professional solution widely adopted in commercial projects. By choosing the right accessories—such as stainless steel hooks, POM or ball-bearing gliders, and heavy-duty track rails—B2B buyers can ensure smooth movement, long-term reliability, and compliance with industry standards.
With proper installation following the steps outlined in this guide, companies can reduce maintenance costs, extend hardware lifespan, and deliver a clean, modern aesthetic suited for hotels, offices, retail stores, and large-scale interior projects.