
Introduction
Curtain tracks are a core hardware component in modern window treatment systems, widely used in residential, hospitality, commercial, and project-based interiors across Europe and North America. For B2B buyers, distributors, contractors, and interior fit-out companies, understanding the correct installation of curtain tracks is not only about functionality, but also about reducing after-sales issues, improving installation efficiency, and ensuring long-term performance.
This guide provides a professional, technically accurate, and SEO-optimized overview of how to install curtain tracks, with a focus on ceiling-mounted and wall-mounted systems, commonly used in hotels, apartments, offices, and large-scale projects.
What Is a Curtain Track System?
A curtain track system is a linear rail mechanism designed to support and guide curtain carriers or gliders smoothly along a fixed path. Compared with traditional curtain rods, tracks offer:
- Higher load capacity (up to 8–12 kg per linear meter depending on material)
- Better compatibility with motorized curtain systems
- Cleaner aesthetics for minimalist and ceiling-integrated designs
- Reduced noise when using silent gliders or roller carriers
Common materials:
- Extruded aluminum alloy (6063-T5 / 6061)
- Powder-coated or anodized finishes
Typical applications:
- Hotels & serviced apartments
- Office buildings
- Healthcare & senior living facilities
- Retail and showroom spaces
Tools and Materials Required
Before installation, ensure all components meet project specifications.
Required Tools
- Laser level or spirit level (±0.5 mm tolerance recommended)
- Electric drill with masonry / wood bits
- Measuring tape (metric & imperial)
- Screwdriver or impact driver
- Pencil or chalk marker
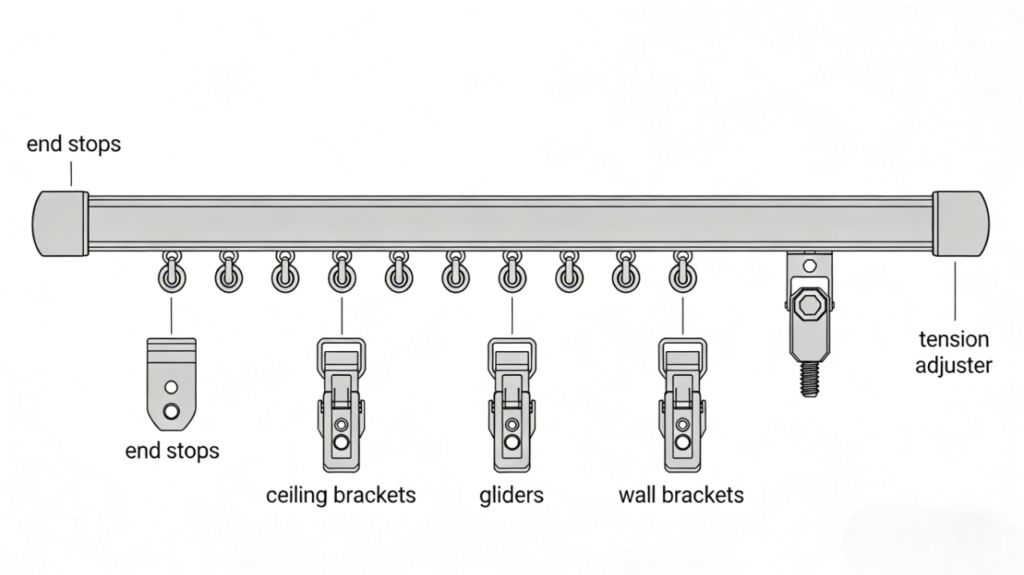
Curtain Track Components
- Curtain track rail (custom cut or standard length)
- Mounting brackets (spacing typically 400–600 mm)
- End caps or stops
- Curtain gliders / carriers (8–12 pcs per meter)
- Expansion anchors or wood screws (based on substrate)
Step-by-Step Guide: How to Install Curtain Tracks
Step 1: Measure and Mark the Installation Area
Accurate measurement is critical for both aesthetics and load distribution.
- Measure total window width and add 150–300 mm extension on each side
- Mark bracket positions using a laser level
- Recommended track distance from wall: 50–80 mm (to avoid curtain stacking issues)
B2B Tip: For hotel projects, always align curtain tracks with ceiling grid modules or drywall joints to avoid rework.
Step 2: Install Mounting Brackets
Bracket installation determines system stability.
- Drill pilot holes according to substrate type
- Use metal anchors for concrete ceilings
- Secure brackets firmly; torque should be consistent
Technical Parameter:
- Maximum deflection allowance: ≤ L/360 under full curtain load
Step 3: Cut and Prepare the Curtain Track
If the track is not pre-cut:
- Use a fine-tooth aluminum saw
- Deburr edges to avoid carrier damage
- Insert gliders before mounting end caps
Note: For curved or bay window curtain tracks, factory pre-bending is strongly recommended.
Step 4: Mount the Curtain Track
- Snap or screw the track into the brackets
- Ensure continuous alignment across joints
- Install end stops to prevent carrier derailment
For ceiling-mounted curtain tracks, confirm ceiling load-bearing capacity meets system requirements.
Step 5: Hang Curtains and Test Operation
- Attach curtains to gliders using hooks or snap carriers
- Slide curtains across full length to check smoothness
- Confirm noise level ≤ 25 dB for silent track systems
Ceiling-Mounted vs Wall-Mounted Curtain Tracks
| Feature | Ceiling-Mounted | Wall-Mounted |
|---|---|---|
| Visual Effect | Minimalist | Traditional |
| Load Distribution | Even | Point-based |
| Common Use | Hotels, modern homes | Residential |
| Installation Complexity | Medium | Low |
B2B Recommendation: Ceiling-mounted curtain tracks are preferred for large-volume hospitality and apartment projects.
Common Installation Mistakes to Avoid
- Incorrect bracket spacing causing track sagging
- Ignoring expansion joints in long tracks (>6 m)
- Using incompatible anchors for ceiling substrates
- Overloading tracks beyond rated capacity
Maintenance and Longevity Tips
- Clean tracks every 6–12 months
- Replace worn gliders proactively
- Avoid lubricant overuse (dry silicone preferred)
Well-installed aluminum curtain tracks typically last 10–15 years in commercial environments.
Conclusion
Installing curtain tracks correctly is a foundational step in delivering reliable, professional window treatment solutions for B2B projects. From precise measurement and bracket spacing to understanding load ratings and substrate requirements, each detail impacts performance, durability, and client satisfaction.
For contractors, distributors, and project buyers, investing in high-quality curtain track systems and standardized installation processes reduces callbacks, enhances brand credibility, and supports scalable business growth in competitive markets.